ShopDreamUp AI ArtDreamUp
Deviation Actions


Promoted Deviations


Suggested Deviants


Suggested Collections


Description
Full view to see the pic.... and preview to read the text... ")
LineART
Colours and Tutorial by me...
See the finished drawing here... [link]
For some reason, people want to know more of this kind of work... So I added that little more text to support the drawing... You don't HAVE to read it... Just for those who want to know... (Wink)")
EDIT: ~NoSolace has removed some mistakes, so it should be completely understandable... (I hope) Thank you for doing this...
........................
WWW.NORKE.BE
Step 1: Find the concept.
When you want to start a drawing, or a painting, make sure you already have your leading pallet in your head. Try to be aware of what you will paint and what you want to conceive with it. If you want to colour an existing drawing like I did in the picture above, try to put yourself in the artist’s mind who drew it. Know what the intentions are and mix them with your own feelings about the drawing. Once you have absorbed everything about this particular piece, you can start to colour it.
Open your image in Photoshop. And adjust the size of it. I try to work with 300 dpi, the rest of the measurements are up to you.
Step 2: Find the right colours.
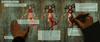
You don’t want to work too much on a drawing. At least not more than needed, so before you step into detailing and advanced colouring, take your time on doing some rough coloring. Add a Multiply layer above your drawing and use your hard round brush with a great variation of Opacity and Size. It’s good to start with a background colour to establish atmosphere. In my walkthrough, I used a set of layers with textures in all different kinds of blending methods and colour layers. These can be seen in the first image of the walkthrough. I then did some rough coloring where I was testing how I could paint the flesh colours on the green background. This is a very important step in the process, because this sets the final colour palette. Make sure you keep light and shadow in mind. The best way you can learn how to handle light and shadow (at least it’s how I learned it) is to paint things white and draw them. I painted apples, bananas, dolls, little clay puppets and so much more. Add them together under a strong light source and try to copy it on paper with all kind of materials like pencil, paint (use of colours is important, even though it’s a white and black set-up). Once you figure out how the shadows fall on white objects, add a coloured object en watch how the coloured light reflects on the other objects. Now you can start mixing different materials like cotton and gold. Take this process as far is you want to. You’ll learn really fast how the light reflects on different materials and how to handle that on 2D images. Make sure you don’t make a mistake doing light and shadow. It has to be well thought out. It’s important that you always see the whole work on your screen, because the re-use of colours in the same work is strongly suggested. I coloured the hair in the same colours as the background to make sure the figure isn’t too independent from the whole picture. When your palette is made and when you are satisfied with your colours scheme, merge all layers together (by selecting them and press Ctrl+Alt+E) and name that layer Rough. Place that layer under your drawing layer. Give the drawing layer a Multiply mode so you can see your colours through your lines. You are ready to go to the next step.
Step 3: Manage your painting.
Some artists refuse to work in layers. Sometimes I start an image and paint everything on the same layer. That’s ok, but you paint over everything, which leads to data loss. You can’t go back or you have to repaint it again. The great thing about working on a computer and using Photoshop or Painter for your work is that you have the option to work in different layers, so why not use them?
There are two methods I use while painting depending on the image I’m working on. You can make layers from different parts of the painting by separating the different colour fields (like I did on this walkthrough) or you can make layers of the status of the development. For instance, make a layer for laying out the basic colors. Another layer would be great for darker colours to add some shadow. And so on. You go from flat to highly detailed. This is a great method when you know exactly which colours you are going to use. I used both methods for this walkthrough. I’ll explain the first method in the next step.
Step 4: Define your colours.
You have two layers now. One named Rough and one with your drawing. Now you should check your chosen colours again and try to find the middle colour in your piece. I’ll give an example. On my rough I added some shades for shadows and light on the body of the character all mixed in one layer. What I have to do now is to take the neutral tint of her skin and paint the whole area of her skin. Therefore, I open a new layer under my drawing but above the layer named Rough. Call it ‘Skin Neutral’. Take a hard round brush with a 100% Opacity. Make a new layer for each different piece in the drawing. Name them the piece they represent followed by the color tint. (ex. Skin Neutral, Hair Neutral, Sweater Neutral, …) Fill these layers with the right colour. If you watch your Rough layer carefully, you will (mostly) be able to separate at least 3 tints, a neutral colour, a lighter tint and a darker tint. Try to capture the neutral tint of the part you are working on and colour this at 100% opacity on the right layer. Work your way trough until you have coloured everything. Depending on what you are drawing you will have a list of different layers.
Step 5: Add some shadows.
To add the shadows I mostly use two layers, one with a slightly darker colour than the neutral tint, and than another one to finish it off with a very dark colour. Let’s take a look at the skin. Click on the layer you made for the neutral skin colour and add another layer above it. Call it: ‘Skin Darker’. Use your darker tint colour you have chosen on your Rough layer, with a very smooth round brush with a very low opacity, you can add your darker shadow. Don’t be afraid to zoom in on the piece you are working on. Just don’t forget to go back and overview the whole piece once and a while. Also, you can flip your canvas to see if your colours scheme is still good. Because you are working on the same artwork, your eyes get used to your work and you might miss some big mistakes. Flipping your work fools your eyes and you’ll see a whole different drawing. You’ll find mistakes which you would have never found previously. If it feels good while flipped, flip it again so it’s back to normal. Continue making layers for each part. You can also make Photoshop Layer Groups for each part. The body alone takes 5 layers. You can make those layer groups by selecting the layers you want to be in the group and press Ctrl+G. You can add another layer in each group to make the darkest shades. Remember: If your model (object) is closer to you than the light source is, your model will be darker then usual. If the light source is directed to the subject, it will be much lighter. So keep that in mind.
Step 6: Add some light.
I won’t take to long on this step, because it’s just the same as doing the darker shades. Just remember to follow your rough colour sketch. Still work in layers. The reason for this layer work is that you can always go back at any time. You can’t when you paint everything on one layer.
Step 7: Adding the details.
For this step I have a superb method in Photoshop. You can paint your painting at 2000% while you can see the same image on 100%. You can do that by going to Window > Arrange > New Window. Then you’ll get a second window with the same work. Go now to Window > Arrange > Tile horizontally. Now you can work on one of the windows and your actions will also take place on the second one. Now it’s time to use the other method of layering. I made a new layer for detailing, so I won’t be worrying about the body, sweater, or anything else. All details go on the same layer on top of the rest. Don’t do too much detailing. Make sure that the eye catches only what it needs to see. Don’t over-do the background unless it’s well thought out.
Step 8: Tweak some adjustments.
This step is easily forgotten and can add so much to your final result. I’m not going to explain all the things here, but I’ll get you started. Now, make all necessary layers visible and save your work for the last time. Afterwards add a new layer on top and press Ctrl+Alt+Shift+E. You will see that your image is now copied in the new layer. You can try some adjustment layers like you would do this with photos. There are a zillion tutorials to explain all that. If you want your image quickly in a new frame, just do following shortcuts: Press Ctrl+A to select the whole image, Ctrl+C to copy it, Ctrl+W to close your frame (save again if you wish), Ctrl+N to open a new window (measurements are correct in default) and then finally Ctr+V to paste your painting in the new frame.
I hope you enjoyed reading this. It was fun writing it…
LineART
Colours and Tutorial by me...
See the finished drawing here... [link]
For some reason, people want to know more of this kind of work... So I added that little more text to support the drawing... You don't HAVE to read it... Just for those who want to know...
EDIT: ~NoSolace has removed some mistakes, so it should be completely understandable... (I hope) Thank you for doing this...
........................
WWW.NORKE.BE
Step 1: Find the concept.
When you want to start a drawing, or a painting, make sure you already have your leading pallet in your head. Try to be aware of what you will paint and what you want to conceive with it. If you want to colour an existing drawing like I did in the picture above, try to put yourself in the artist’s mind who drew it. Know what the intentions are and mix them with your own feelings about the drawing. Once you have absorbed everything about this particular piece, you can start to colour it.
Open your image in Photoshop. And adjust the size of it. I try to work with 300 dpi, the rest of the measurements are up to you.
Step 2: Find the right colours.
You don’t want to work too much on a drawing. At least not more than needed, so before you step into detailing and advanced colouring, take your time on doing some rough coloring. Add a Multiply layer above your drawing and use your hard round brush with a great variation of Opacity and Size. It’s good to start with a background colour to establish atmosphere. In my walkthrough, I used a set of layers with textures in all different kinds of blending methods and colour layers. These can be seen in the first image of the walkthrough. I then did some rough coloring where I was testing how I could paint the flesh colours on the green background. This is a very important step in the process, because this sets the final colour palette. Make sure you keep light and shadow in mind. The best way you can learn how to handle light and shadow (at least it’s how I learned it) is to paint things white and draw them. I painted apples, bananas, dolls, little clay puppets and so much more. Add them together under a strong light source and try to copy it on paper with all kind of materials like pencil, paint (use of colours is important, even though it’s a white and black set-up). Once you figure out how the shadows fall on white objects, add a coloured object en watch how the coloured light reflects on the other objects. Now you can start mixing different materials like cotton and gold. Take this process as far is you want to. You’ll learn really fast how the light reflects on different materials and how to handle that on 2D images. Make sure you don’t make a mistake doing light and shadow. It has to be well thought out. It’s important that you always see the whole work on your screen, because the re-use of colours in the same work is strongly suggested. I coloured the hair in the same colours as the background to make sure the figure isn’t too independent from the whole picture. When your palette is made and when you are satisfied with your colours scheme, merge all layers together (by selecting them and press Ctrl+Alt+E) and name that layer Rough. Place that layer under your drawing layer. Give the drawing layer a Multiply mode so you can see your colours through your lines. You are ready to go to the next step.
Step 3: Manage your painting.
Some artists refuse to work in layers. Sometimes I start an image and paint everything on the same layer. That’s ok, but you paint over everything, which leads to data loss. You can’t go back or you have to repaint it again. The great thing about working on a computer and using Photoshop or Painter for your work is that you have the option to work in different layers, so why not use them?
There are two methods I use while painting depending on the image I’m working on. You can make layers from different parts of the painting by separating the different colour fields (like I did on this walkthrough) or you can make layers of the status of the development. For instance, make a layer for laying out the basic colors. Another layer would be great for darker colours to add some shadow. And so on. You go from flat to highly detailed. This is a great method when you know exactly which colours you are going to use. I used both methods for this walkthrough. I’ll explain the first method in the next step.
Step 4: Define your colours.
You have two layers now. One named Rough and one with your drawing. Now you should check your chosen colours again and try to find the middle colour in your piece. I’ll give an example. On my rough I added some shades for shadows and light on the body of the character all mixed in one layer. What I have to do now is to take the neutral tint of her skin and paint the whole area of her skin. Therefore, I open a new layer under my drawing but above the layer named Rough. Call it ‘Skin Neutral’. Take a hard round brush with a 100% Opacity. Make a new layer for each different piece in the drawing. Name them the piece they represent followed by the color tint. (ex. Skin Neutral, Hair Neutral, Sweater Neutral, …) Fill these layers with the right colour. If you watch your Rough layer carefully, you will (mostly) be able to separate at least 3 tints, a neutral colour, a lighter tint and a darker tint. Try to capture the neutral tint of the part you are working on and colour this at 100% opacity on the right layer. Work your way trough until you have coloured everything. Depending on what you are drawing you will have a list of different layers.
Step 5: Add some shadows.
To add the shadows I mostly use two layers, one with a slightly darker colour than the neutral tint, and than another one to finish it off with a very dark colour. Let’s take a look at the skin. Click on the layer you made for the neutral skin colour and add another layer above it. Call it: ‘Skin Darker’. Use your darker tint colour you have chosen on your Rough layer, with a very smooth round brush with a very low opacity, you can add your darker shadow. Don’t be afraid to zoom in on the piece you are working on. Just don’t forget to go back and overview the whole piece once and a while. Also, you can flip your canvas to see if your colours scheme is still good. Because you are working on the same artwork, your eyes get used to your work and you might miss some big mistakes. Flipping your work fools your eyes and you’ll see a whole different drawing. You’ll find mistakes which you would have never found previously. If it feels good while flipped, flip it again so it’s back to normal. Continue making layers for each part. You can also make Photoshop Layer Groups for each part. The body alone takes 5 layers. You can make those layer groups by selecting the layers you want to be in the group and press Ctrl+G. You can add another layer in each group to make the darkest shades. Remember: If your model (object) is closer to you than the light source is, your model will be darker then usual. If the light source is directed to the subject, it will be much lighter. So keep that in mind.
Step 6: Add some light.
I won’t take to long on this step, because it’s just the same as doing the darker shades. Just remember to follow your rough colour sketch. Still work in layers. The reason for this layer work is that you can always go back at any time. You can’t when you paint everything on one layer.
Step 7: Adding the details.
For this step I have a superb method in Photoshop. You can paint your painting at 2000% while you can see the same image on 100%. You can do that by going to Window > Arrange > New Window. Then you’ll get a second window with the same work. Go now to Window > Arrange > Tile horizontally. Now you can work on one of the windows and your actions will also take place on the second one. Now it’s time to use the other method of layering. I made a new layer for detailing, so I won’t be worrying about the body, sweater, or anything else. All details go on the same layer on top of the rest. Don’t do too much detailing. Make sure that the eye catches only what it needs to see. Don’t over-do the background unless it’s well thought out.
Step 8: Tweak some adjustments.
This step is easily forgotten and can add so much to your final result. I’m not going to explain all the things here, but I’ll get you started. Now, make all necessary layers visible and save your work for the last time. Afterwards add a new layer on top and press Ctrl+Alt+Shift+E. You will see that your image is now copied in the new layer. You can try some adjustment layers like you would do this with photos. There are a zillion tutorials to explain all that. If you want your image quickly in a new frame, just do following shortcuts: Press Ctrl+A to select the whole image, Ctrl+C to copy it, Ctrl+W to close your frame (save again if you wish), Ctrl+N to open a new window (measurements are correct in default) and then finally Ctr+V to paste your painting in the new frame.
I hope you enjoyed reading this. It was fun writing it…
Image size
1915x800px 1.47 MB
© 2005 - 2025 Norke
Comments156
Join the community to add your comment. Already a deviant? Log In
Thanks for the tutorial!